Wednesday, June 21, 2023

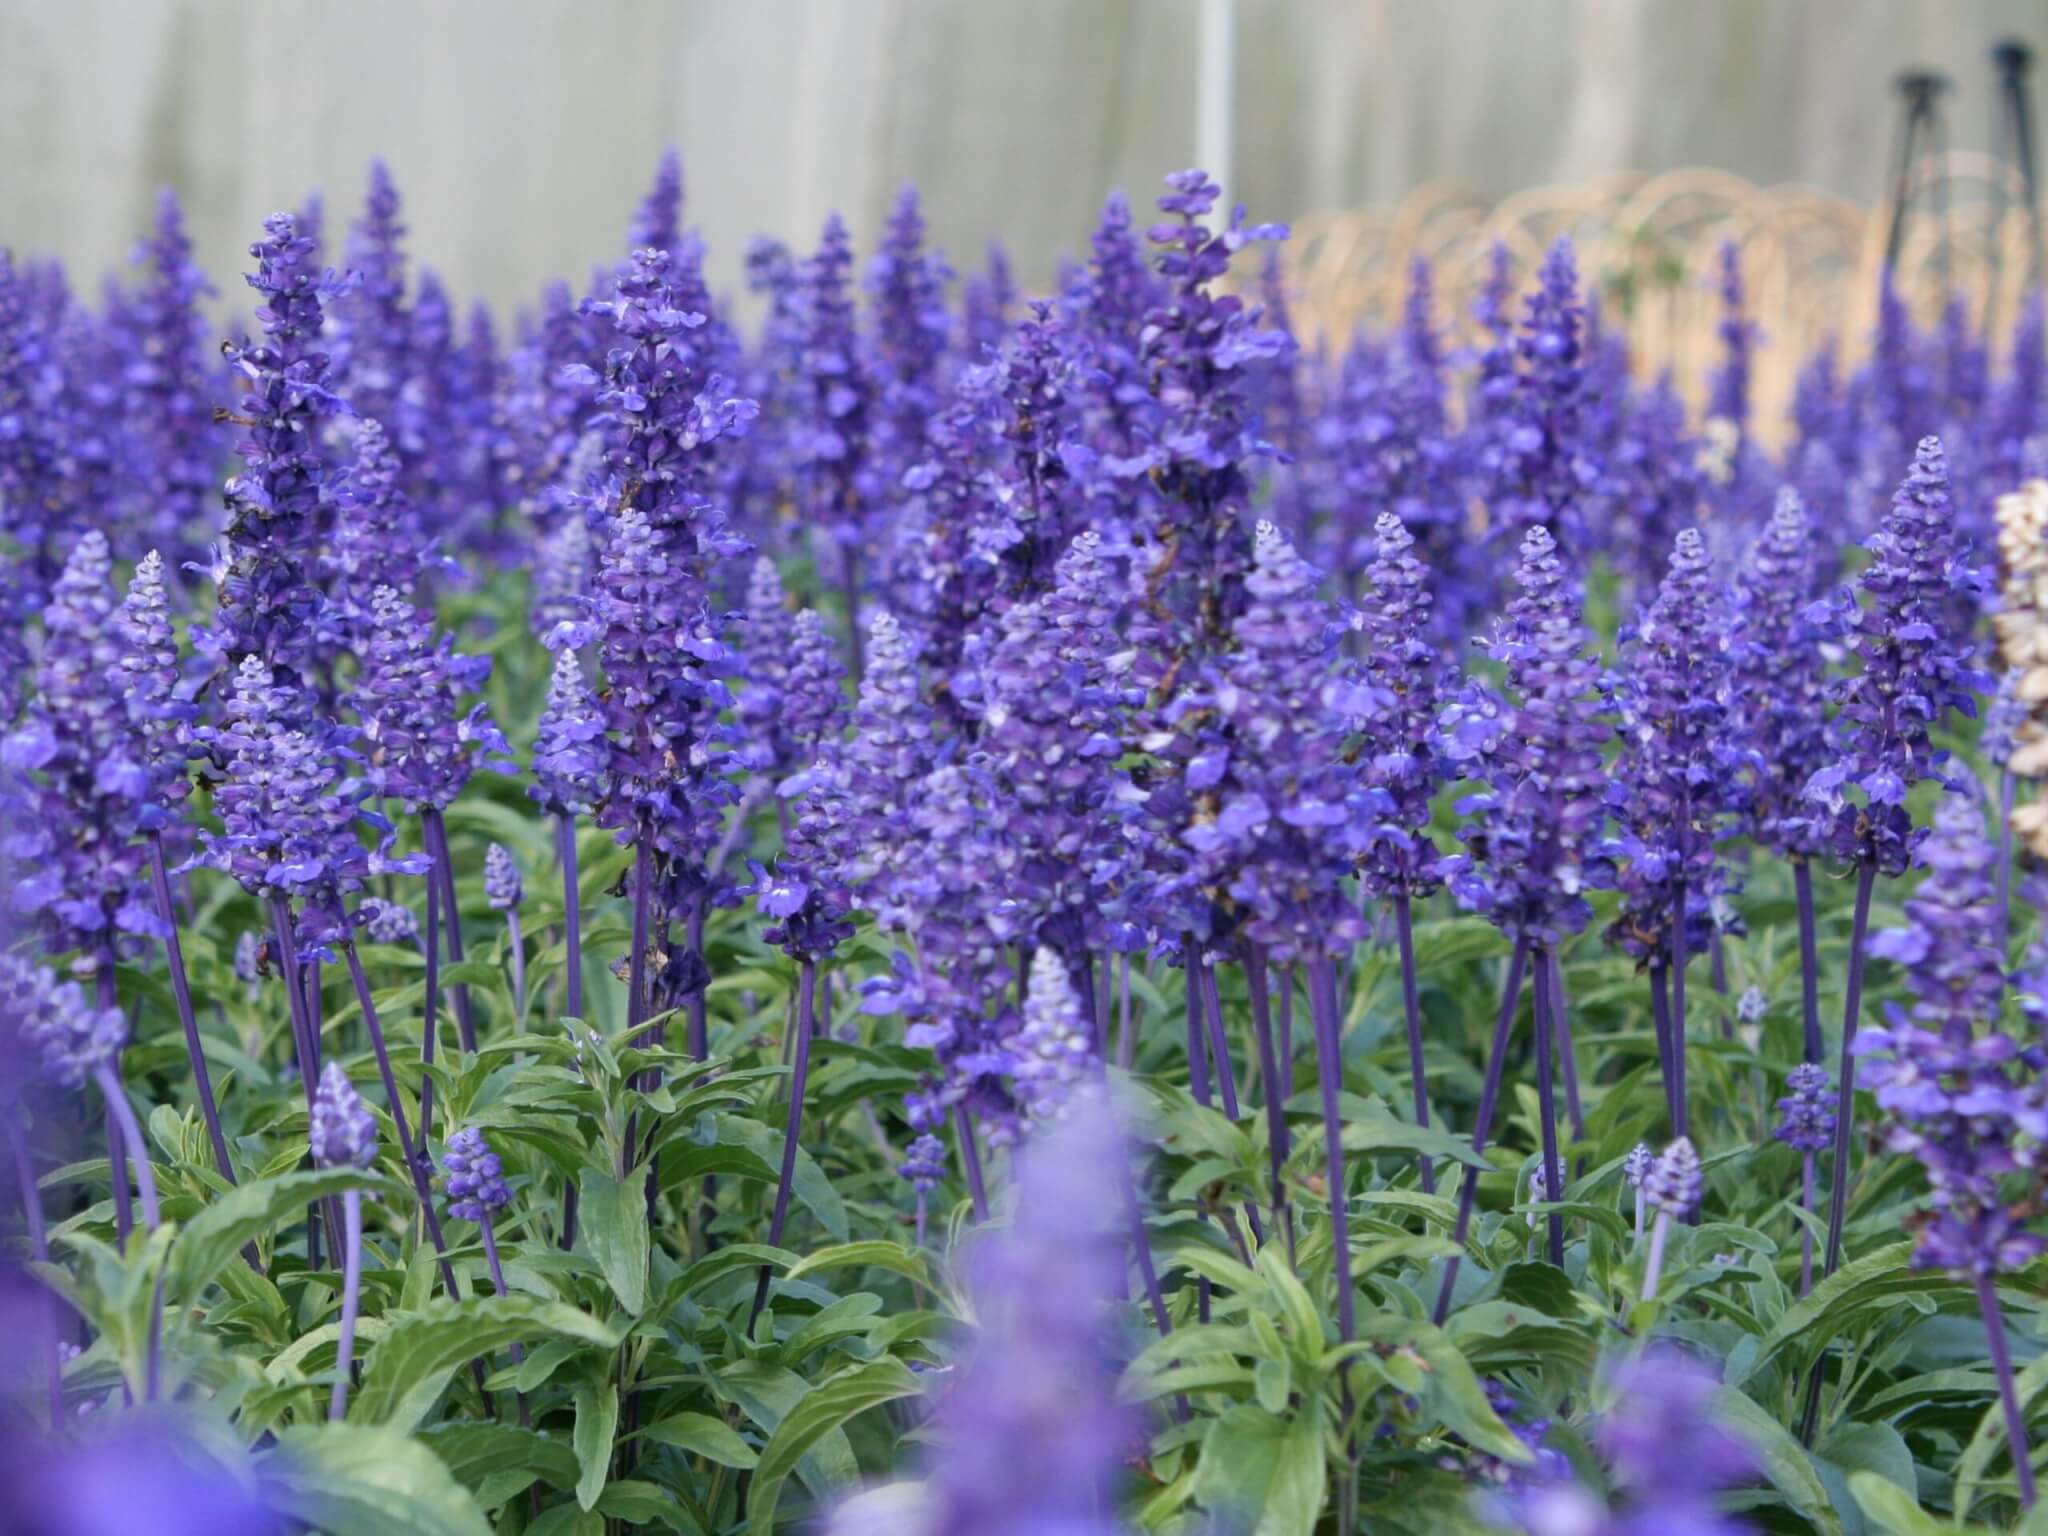
How to grow salvia?

 Salvia, Velocity Blue - Campbell's Nursery

Salvia, also known as sage, is a beautiful and versatile herbaceous plant that comes in a wide variety of species and cultivars. Here are some general guidelines for growing salvia:

  1. Select the Right Salvia Variety: There are many different types of salvia, so choose a variety that is suitable for your climate, growing conditions, and desired purpose. Common varieties include Salvia officinalis (culinary sage), Salvia splendens (scarlet sage), and Salvia nemorosa (meadow sage), among others.

  2. Planting:

    • Timing: Plant salvia in the spring after the last frost date or in the fall, giving the roots time to establish before winter.
    • Sun Exposure: Salvia prefers full sun to thrive and produce abundant flowers. Make sure the planting location receives at least 6 hours of direct sunlight per day.
    • Soil: Salvia grows best in well-draining soil with a pH range of 6.0 to 7.5. Amend heavy or clay soils with organic matter to improve drainage.
    • Spacing: Follow the spacing recommendations for the specific variety you are growing. In general, space the plants 12 to 24 inches apart to allow for good air circulation.
  3. Watering:

    • Establishment Period: Water newly planted salvia regularly to help the roots establish. Keep the soil evenly moist but not waterlogged.
    • Mature Plants: Once established, salvia is relatively drought-tolerant. Water deeply but infrequently, allowing the soil to dry out between waterings. Avoid overwatering, as it can lead to root rot.
  4. Mulching: Apply a layer of organic mulch around the base of the plants to help conserve moisture, suppress weed growth, and regulate soil temperature. Keep the mulch a few inches away from the stems to prevent excess moisture accumulation.

  5. Fertilization: Salvia generally doesn't require heavy fertilization. Incorporate compost or well-balanced organic fertilizer into the soil before planting. If necessary, you can apply a slow-release fertilizer once or twice during the growing season, following the instructions on the package.

  6. Pruning:

    • Deadheading: Remove faded flowers regularly (a process called deadheading) to encourage continuous blooming.
    • Pruning: Trim back salvia plants after the main flowering period to encourage new growth and potentially a second flush of flowers. Cut back about one-third of the plant's height, removing any leggy or spent stems.
  7. Pest and Disease Management: Salvia is generally resistant to pests and diseases. However, keep an eye out for common garden pests like aphids, spider mites, or powdery mildew. Use organic pest control methods if necessary, such as insecticidal soap or neem oil.

  8. Winter Care: Some salvia varieties are perennial, while others are annual or tender perennials. Follow the specific care recommendations for the variety you are growing. In colder climates, protect perennial salvia with a layer of mulch to insulate the roots during winter.

By following these guidelines, you can enjoy the beauty and fragrance of salvia in your garden. Remember to choose the appropriate variety for your climate and growing conditions, and provide it with the proper care it needs to thrive.


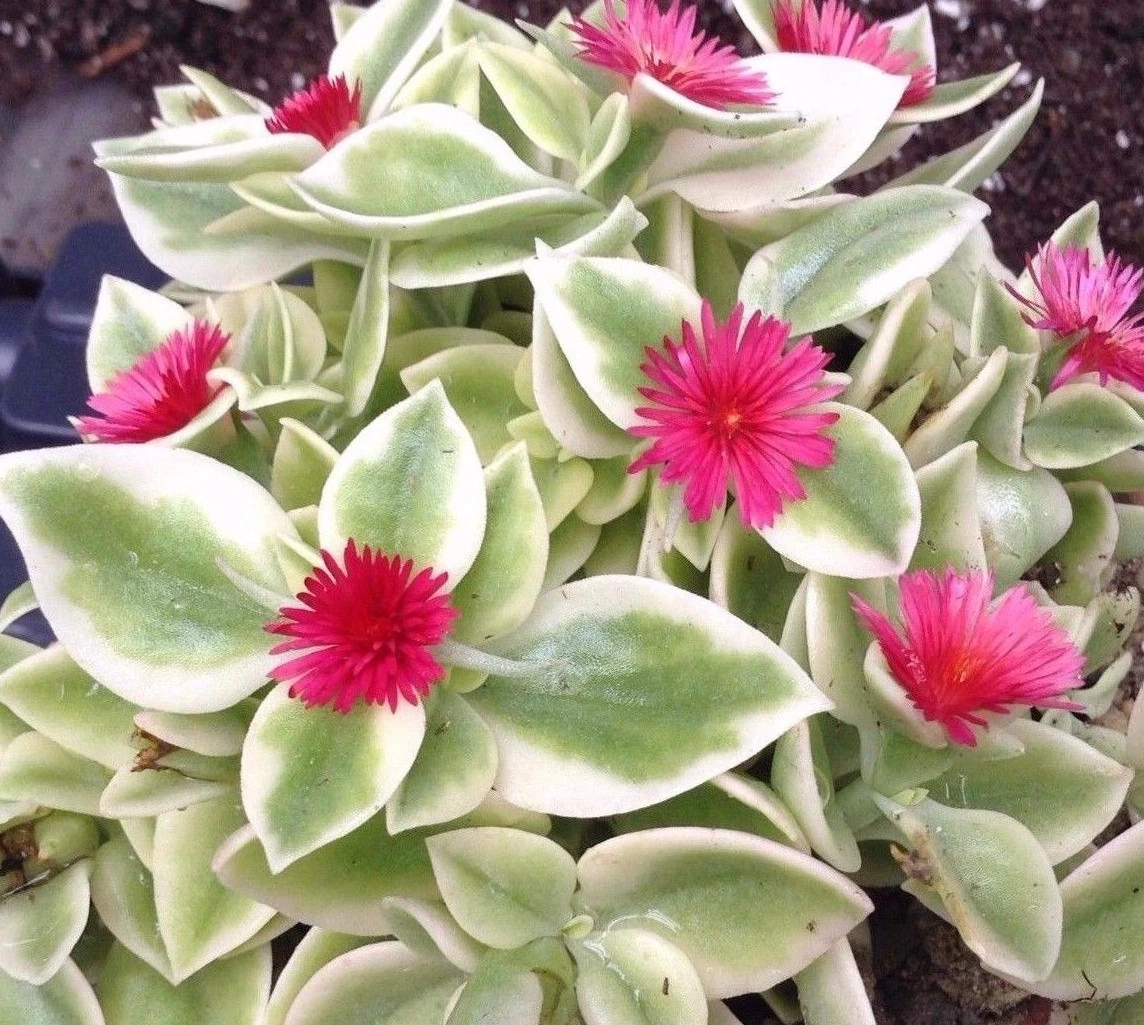
How to grow aptenia cordifolia, red apple flat or heartleaf ice plant?

 APTENIA CORDIFOLIA 'HEARTLEAF ICEPLANT', 'BABY SUN  ROSE', 'RED APPLE' 2 " POT | eBay

Aptenia cordifolia, also known as Red Apple Flat or Heartleaf Ice Plant, is a low-growing succulent plant that is native to South Africa. Here are the steps to grow Aptenia cordifolia:

  1. Select a Suitable Location: Aptenia cordifolia prefers full sun to partial shade. Choose a location in your garden or a container where the plant will receive at least 4-6 hours of direct sunlight per day.

  2. Prepare the Soil: Aptenia cordifolia prefers well-draining soil. If the soil in your garden is heavy or clay-like, consider adding organic matter such as compost or well-rotted manure to improve drainage and fertility.

  3. Planting:

    • Dig a hole that is slightly larger than the root ball of the plant.
    • Place the plant in the hole and backfill with soil, gently firming it around the roots.
    • Water the plant thoroughly after planting to help settle the soil.
  4. Watering: Aptenia cordifolia is drought-tolerant once established and is more susceptible to root rot in overly wet conditions. Water the plant deeply but infrequently, allowing the soil to dry out between waterings. Avoid overwatering.

  5. Mulching: Applying a layer of organic mulch around the plant can help conserve moisture, suppress weed growth, and moderate soil temperature. Keep the mulch a few inches away from the stem to prevent excess moisture accumulation around the base of the plant.

  6. Fertilization: Aptenia cordifolia is not heavy feeders, but you can apply a balanced, slow-release fertilizer once or twice a year in the spring and summer. Follow the instructions on the fertilizer package for application rates.

  7. Pruning: Aptenia cordifolia has a spreading growth habit and can benefit from occasional pruning to control its size and shape. You can trim back the plant in early spring to promote bushier growth and remove any dead or damaged stems.

  8. Propagation: Aptenia cordifolia can be propagated easily from stem cuttings. Simply take a stem cutting from a healthy plant, remove the lower leaves, and allow the cutting to dry for a few days. Then, plant the cutting in well-draining soil and keep it lightly moist until roots develop.

  9. Pests and Diseases: Aptenia cordifolia is generally resistant to pests and diseases. However, overwatering or poorly drained soil can lead to root rot or fungal issues. Ensure good air circulation and avoid excessive moisture to prevent such problems.

  10. Winter Care: Aptenia cordifolia is hardy to USDA zones 9-11 and may require protection or brought indoors in colder regions. If you live in a colder climate, consider growing Aptenia cordifolia in containers that can be moved indoors during winter or provide frost protection to the plant.

With proper care and the right growing conditions, Aptenia cordifolia can thrive and provide beautiful ground cover or trailing foliage with its vibrant red flowers.


Tuesday, June 20, 2023

How to hybridize irises?


Hybridizing irises can be an exciting and rewarding process for gardeners who want to create new and unique iris varieties. Here are the general steps to hybridize irises:

  1. Select Parent Plants: Choose two iris plants with desirable traits that you want to combine in the offspring. It's important to select healthy plants that are free from diseases or pests. Consider factors such as flower color, shape, size, fragrance, and overall plant vigor.

  2. Timing: Hybridization is typically done when the iris plants are in bloom. It's important to have both the "pollen parent" (the plant providing the pollen) and the "pod parent" (the plant receiving the pollen) in bloom at the same time.

  3. Preparing for Hybridization:

    • Identify the parts of the iris flower: The male reproductive organ, called the stamen, produces pollen, while the female reproductive organ, called the pistil, has a structure called the stigma that receives pollen.
    • Remove unwanted parts: Gently remove the petals and sepals of the flower, being careful not to damage the reproductive organs. This helps expose the stigma for pollen reception.
  4. Pollination:

    • Pollen Transfer: Take the pollen from the stamen of the pollen parent iris and transfer it to the stigma of the pod parent iris. You can use a small artist's paintbrush or a cotton swab to carefully collect pollen from the stamen and transfer it to the stigma. Alternatively, you can carefully remove the anther (the part of the stamen holding the pollen) and gently rub it against the stigma.
    • Labeling: Keep track of the crosses you make by labeling the flowers with the parents' names or using a small tag or marker to identify the crosses.
  5. Protecting the Cross:

    • Cover the pollinated flower: To prevent unwanted pollination from insects or wind-blown pollen, cover the pollinated flower with a small bag made of breathable material such as tulle or nylon mesh. Secure the bag gently around the stem with a twist tie or string. This helps protect the developing seed pod from unwanted pollination.
  6. Seed Development:

    • Allow the pollinated flower to form a seed pod: After successful pollination, the flower will start developing a seed pod. This process can take several weeks. The pod will grow and eventually turn brown and dry.
    • Harvesting the seeds: Once the seed pod is fully mature and dry, carefully remove it from the plant. Gently open the pod to collect the seeds. Dry the seeds further if needed and store them in a cool, dry place.
  7. Seed Germination and Planting:

    • Stratification: Some iris seeds may require a period of cold stratification to break dormancy and encourage germination. Place the seeds in a damp paper towel or seal them in a plastic bag with moist vermiculite or peat moss. Keep them in the refrigerator for several weeks before planting.
    • Planting the seeds: Fill seed trays or pots with a well-draining potting mix. Plant the seeds just below the soil surface and lightly cover them. Keep the soil consistently moist but not waterlogged.
    • Transplanting: Once the seedlings have grown and developed several leaves, they can be transplanted into individual pots or directly into the garden.

Remember that hybridizing irises can be a complex and time-consuming process, and not all crosses will yield desirable results. It may take several generations of selective breeding to achieve the desired traits. Enjoy the journey and have fun experimenting with different combinations to create unique iris varieties!


How to get rid of iris fugus?


To get rid of iris fungus, it's important to take prompt action and implement effective control measures. Here are some steps you can follow to manage and eliminate iris fungus:

  1. Identify the Fungal Infection: Properly identify the specific fungus affecting your irises. This will help determine the most appropriate control measures. If you're unsure about the specific fungus, consult with a local plant disease specialist or horticulturist for assistance.

  2. Remove and Destroy Infected Plant Material: Start by removing any infected plant material, including leaves, flowers, and rhizomes. Prune off and discard any visibly infected parts, making sure not to compost them or leave them on the ground. This helps prevent the spread of the fungus to healthy plants.

  3. Improve Air Circulation: Create a well-ventilated environment around your irises by spacing them properly. Adequate airflow reduces humidity and moisture levels, making the conditions less favorable for fungal growth. Trim back nearby vegetation or prune overhanging branches that may be blocking air movement.

  4. Water Wisely: Avoid overhead watering, as wet foliage can promote fungal growth. Instead, water at the base of the plants, keeping the leaves dry. Water early in the day, allowing sufficient time for the foliage to dry before evening.

  5. Improve Soil Drainage: Ensure that the soil is well-draining to prevent waterlogged conditions. If the soil retains excessive moisture, consider amending it with organic matter or creating raised beds to improve drainage.

  6. Practice Crop Rotation: If the fungal infection persists, practice crop rotation by avoiding planting irises or related plants in the same location for several years. This helps break the disease cycle and reduces the chances of reinfection.

  7. Apply Fungicides: In severe cases or when other control measures have been ineffective, you may consider using fungicides labeled for use on irises. Fungicides containing active ingredients such as chlorothalonil, mancozeb, or myclobutanil can be effective in managing fungal infections. Follow the instructions on the product label carefully, including application rates, timing, and safety precautions.

  8. Maintain Garden Hygiene: Keep the garden area clean and free from debris, fallen leaves, and plant residues. Regularly remove any dead or decaying plant material, as it can harbor fungal spores and contribute to the spread of the infection.

Remember, prevention is key in managing iris fungus. By practicing good cultural practices, providing optimal growing conditions, and promptly addressing any signs of infection, you can help prevent and control fungal diseases in your iris plants.


What are the different types of fungal disease that affect irises?


Irises are susceptible to several fungal diseases that can affect their overall health and appearance. Here are some common fungal diseases that can impact irises:

  1. Leaf Spot (Iris Leaf Spot): Leaf spot is caused by various fungal pathogens, including Didymellina macrospora and Alternaria species. It manifests as small to large brown or black spots on the leaves. As the disease progresses, the spots may enlarge and merge together, leading to leaf yellowing and eventual defoliation.

  2. Iris Rust (Puccinia iridis): Iris rust is characterized by orange to reddish-brown pustules or powdery masses on the undersides of the leaves. These pustules contain spores that can easily spread to other plants. Infected leaves may turn yellow, wither, and die prematurely.

  3. Soft Rot (Rhizome Rot): Soft rot is a fungal disease caused by various pathogens, including Phytophthora and Pythium species. It affects the iris rhizomes, causing them to become mushy, slimy, and foul-smelling. Infected rhizomes can eventually rot and lead to the death of the plant.

  4. Botrytis Blight (Gray Mold): Botrytis cinerea is the primary causal agent of botrytis blight. It typically affects iris flowers, causing browning and withering of petals. The disease may also spread to the foliage, causing browning and dieback of the leaves. Under humid conditions, a grayish mold may develop on the affected plant parts.

  5. Fusarium Crown Rot (Fusarium oxysporum): Fusarium crown rot affects the crown and rhizomes of irises, leading to rotting and decay. Infected plants often exhibit stunted growth, yellowing, and wilting of the foliage. The disease progresses from the crown towards the rhizomes, resulting in the death of the plant.

  6. Sclerotinia Rot (Sclerotinia sclerotiorum): Sclerotinia rot affects various parts of the iris plant, including the rhizomes, stems, and leaves. Infected tissues may exhibit water-soaked lesions, which later become brown and sunken. White, fluffy mycelium and hard black sclerotia may develop on the affected plant parts.

Preventing or managing fungal diseases in irises involves several measures, including:

  • Planting disease-resistant iris varieties.
  • Providing proper spacing between plants to promote airflow.
  • Watering at the base of the plant and avoiding overhead irrigation.
  • Removing and destroying infected plant material.
  • Practicing good garden hygiene and sanitation.
  • Using fungicides as a preventive measure or to control severe infections, following label instructions.

Regular monitoring and early intervention are crucial in managing fungal diseases in irises. By implementing appropriate preventive measures and taking prompt action when necessary, you can help protect your irises from fungal infections and maintain their health and vigor.


What causes irises leaves to turn yellow?


Yellowing leaves in irises can be caused by various factors. Here are some common reasons for iris leaves turning yellow:

  1. Natural Aging: It is normal for older leaves at the base of the plant to turn yellow and die off naturally. This is a part of the plant's growth cycle and shouldn't be a cause for concern.

  2. Overwatering: Excessive moisture in the soil can lead to root rot, which can cause yellowing of the leaves. If the soil is consistently waterlogged or the plant is receiving too much water, the roots may suffocate, leading to yellowing and wilting of the leaves.

  3. Underwatering: On the other hand, underwatering can also cause yellowing of the leaves. If the soil becomes too dry and the plant doesn't receive enough water, the leaves may turn yellow and become crispy.

  4. Nutrient Deficiencies: Lack of essential nutrients, particularly nitrogen, can result in yellowing leaves. Nitrogen deficiency is often characterized by yellowing of older leaves while the veins remain green. Providing a balanced fertilizer can help address nutrient deficiencies.

  5. Sunburn: Irises require a certain amount of sunlight, but excessive exposure to direct sunlight, especially during hot and dry conditions, can cause sunburn on the leaves. Sunburned leaves may turn yellow, develop brown patches, or become crispy.

  6. Pests and Diseases: Certain pests and diseases can cause yellowing of iris leaves. For example, iris borers can bore into the rhizomes and cause foliage discoloration. Fungal diseases like leaf spot or iris rust can also lead to yellowing and browning of the leaves.

  7. Soil pH Imbalance: Irises prefer slightly acidic to neutral soil pH. If the soil pH is too high or too low, it can affect nutrient availability, leading to yellowing leaves. Testing the soil pH and making appropriate amendments can help address this issue.

To address yellowing leaves in irises, consider the following actions:

  • Adjust watering practices to ensure proper moisture levels. Water deeply when the top inch of soil is dry and avoid both overwatering and underwatering.
  • Provide a balanced fertilizer to address nutrient deficiencies.
  • Protect irises from excessive sunlight by providing partial shade or using shade cloth during the hottest part of the day.
  • Inspect plants for signs of pests or diseases and take appropriate measures for control.
  • Monitor soil pH and make necessary adjustments if the pH is imbalanced.

By addressing the underlying cause of yellowing leaves and providing the appropriate care, you can help maintain healthy and vibrant irises.


How to avoid overwatering irises to avoid rotting of the iris rhizome?


Avoiding overwatering is crucial to prevent rotting of iris rhizomes. Here are some tips to help you avoid overwatering irises:

  1. Watering Frequency: Water irises only when necessary. Before watering, check the moisture level of the soil by inserting your finger into the soil up to the first knuckle. If the top inch of soil feels dry, it's time to water. Avoid watering on a fixed schedule and instead adjust it based on the specific needs of your plants and the weather conditions.

  2. Deep Watering: When you do water your irises, water deeply. This means providing enough water to reach the root zone. Allow the water to soak into the soil until it reaches a depth of at least 6 to 8 inches. This promotes deeper root growth and helps the plant access water stored in the lower soil layers, reducing the need for frequent watering.

  3. Watering Technique: Water the soil directly at the base of the plants rather than sprinkling water over the foliage. This helps ensure that the water reaches the root zone where it is needed the most. Avoid wetting the leaves and rhizomes, as excess moisture can increase the risk of rot.

  4. Mulching: Apply a layer of organic mulch around the base of the plants. Mulch helps retain soil moisture and regulates soil temperature, reducing water evaporation. However, keep the mulch a few inches away from the rhizomes to prevent excess moisture retention and potential rotting.

  5. Soil Drainage: Ensure that the soil has good drainage to prevent waterlogging. If you have heavy clay soil or poorly draining soil, amend it with organic matter like compost or aged manure to improve drainage. This helps water move away from the rhizomes and reduces the risk of rot.

  6. Rainwater Collection: Utilize rainwater as a source of irrigation for your irises. Collect rainwater in barrels or containers and use it to water your plants. Rainwater is free from chemicals and typically has a balanced pH, making it beneficial for the plants.

  7. Monitor the Weather: Be mindful of the weather conditions and adjust your watering accordingly. During periods of rainfall or high humidity, you may need to reduce or skip watering to avoid waterlogged conditions.

Remember that it's better to slightly underwater irises than to overwater them. The plants can tolerate some dryness, but excess moisture can lead to rotting. Regularly monitor the moisture levels of the soil and adjust your watering practices accordingly. By providing adequate, deep watering when needed and ensuring proper soil drainage, you can help prevent rotting of iris rhizomes due to overwatering.


How to grow a healthy Drawf Banana plant

  The Ultimate Guide to Growing Your Own Dwarf Banana Tree 🌴 Growing a dwarf banana tree is the easiest way to bring a lush, tropical oasi...